Timing
I started this project on March 8th and finished on May 31st – not quite three months. The deadline was my graduation date; the project was to “create a 3-5 minute animation based on your own original story”. When I began, I didn’t think it would be too much work, so I put about an hour a day into it, at first creating a shot list, then storyboarding, then creating rigs and props. But by the time I got around to actually assembling shots, it had been a full month and I suddenly realized that I had a lot of work ahead of me. From that point on, it became basically a full-time job, on top of the rest of my schoolwork and a real part-time job.
From April 10th to May 13th, I worked pretty much nonstop. I don’t think I’ve ever worked on a project so much and so quickly. The A Quiet Place Opening Sequence animation that I did was much shorter, but it took me a year to complete! This just shows the power of a deadline, haha. This one took me almost 250 hours to complete, most of it being in the final month.
Concept and Inspiration
The assignment, as I’ve said, was to create my own original story and animation. Since that’s not really something I’ve done before (Nightmare technically fits that category, but that was early on, before I really knew what I was doing or how to properly carry out such a vision), I wanted to do it right, but I didn’t know how much work it would be.
I’ve been writing a book since early 2020; it takes a lot of inspiration from The Hunger Games, Divergent, Maze Runner, and books like that. It’s a dystopian thriller in which a girl, Abby, has to survive in a world after the world collapses. She lives in a city where the government is oppressive and doesn’t care about the lives of the civilians; early on in the book, she meets a boy named Calvin, and the rest of the book is the story of them trying to survive through a series of predicaments and enemies, including the Sentinels (the white-suited military) and a mysterious, monstrous creature.
I had a fair number of references/inspiration that I collected during the planning stage:
- The Hunger Games
- A Quiet Place (parts I and II), including the trailer for part II
- Jurassic World
- The scenes of ACU gearing up and traveling out to meet the Indominus were super inspirational for my scenes of the Sentinels gearing up to hunt the creature
- John Wick
- Various Minecraft videos, including:
- SCP: Overlord
- Several clips of real-life weapons firing (including rocket launchers; I put a lot of love and research into that rocket launcher shot near the end xD)
Storyboarding and Planning
I began by creating a shot list by listening to the song over, and over, and over, and writing out at what points I wanted to cut to a new shot. ChatGPT helped me with this a bit; I asked it for a basic outline after I had times marked out, and it gave me one. Probably less than 20% of the final shot list was even partially written by ChatGPT; I changed it a lot, most of it didn’t make sense for the story I was telling, but it certainly was helpful to have a starting point. I think I would use this process again, just because of the timesaver and psychological boost it is to have somewhere to start from even if it’s not somewhere particularly good.
Overall, that shot planning took 10-15 hours to bring from initial idea to finished list of shots that I wanted to do. (Later, I did end up changing a few of them, but for the most part, what was on that list carried through.) Then I converted it to a spreadsheet with all of the things I needed to do to each shot. It was pretty intimidating at first, to see all that red, but as the boxes began filling in to green, it was very motivating!! I would definitely recommend this spreadsheet approach if you’re tackling a large project with a lot of shots. It helps keep everything organized and keep track of the amount of work there is left.


Then I started making a storyboard using Blender’s Grease Pencil tool. This isn’t something I had any previous experience with, so it came with a bit of a learning curve. However, after some time working with it, I got a flow down, and after about 22 hours of work, it was done. Again, this was taken directly from the shot list, and as I later changed a couple shots, it’s not 100% the same as the final animation; but it’s probably 95%.
I plan on releasing a side-by-side video that shows the storyboard vs. the final animation (UPDATE: it’s out!!), so look forward to seeing my terrible drawing skills with a mouse 😀
Creating Assets
Before I could get to assembling any shots, I had to create all the assets ahead of time. A some of them were downloaded from Sketchfab and modified to fit my needs, but most were created from scratch. These included:

- Character Rigs (each of which took several hours, with skin creation, rig application, hair simulation, and any other assets that were needed)
- Abby
- Calvin
- The Sentinels
- The Creature (this one took quite some time, as I wanted to figure out how to make it look scary, unfamiliar, and still clearly Minecraft)
- Samuel (the guy we see shouting into a radio near the end)
- The Doctor (unfortunately he was only seen in one shot, from the back, running)
- 6 variations of citizens (to instance many times throughout the crowd shots)
- Variations of these same citizens, covered in blood, for the massacre shots

- Weapons
- Sentinel Rocket Launcher
- Sentinel Rifle
- Sentinel Pistol
- Sentinel Grenade

- Objects
- Small:
- Handheld Radio (downloaded and modified)
- Grenade Case
- Supplies (handed out in the square by Sentinels)
- 5-6 Minecraft-style backpacks (I had a plan for these but didn’t end up using them, so that’s a few hours down the drain!)
- Pipe (downloaded)
- Small:
- Large:
- Jersey Barriers (downloaded and modified)
- Swinging Door (downloaded and modified)
- Stretcher (downloaded and modified)
- Warehouse Props:
- Shipping Container (downloaded and modified)
- Steel Doors (downloaded and modified)
- Crane and Boxes (downloaded and modified)
- Wooden Pallet (downloaded and modified)
- Blood textures (downloaded from ActionVFX, pixelated to fit the Minecraft style)

- Locations:
- Abandoned City map (downloaded and modified – crucial for this animation!! Glad I found it; would have taken far too long to create one myself.)
- Heavily modified areas:
- Main square, stairs that lead up to the Council Building (where Sentinels are guarding)
- Crumbling archway that Abby walks through after Sentinels are massacred (and surrounding area)
- Heavily modified areas:
- Warehouse, inside and outside, including road and forest
- Section of road, wall, and gate that enters city (where Sentinels fight creature)
- Forest with Creature burrow
- Facility Interiors
- Hallway
- Procedure Room
- Back Room
- 2-3 other variations of small rooms inside the Facility
- Abandoned City map (downloaded and modified – crucial for this animation!! Glad I found it; would have taken far too long to create one myself.)
Animation Process
Animation was one of the longest parts of the whole process. It generally is; hand-animation can take incredible amounts of time and effort if you want good, realistic results. However, I had a deadline here, and by the time I was starting the actual animating, I had less than a month to create 73 shots. As you saw in the spreadsheet, I had them classified as either simple, medium, or complex; the simple shots were generally something that wouldn’t take long because I had previous work I could reference from or reuse somehow (or they were just very simple things like a sunset). For instance, in the beginning shot of characters walking, I reused previous walk cycles I’ve created so I didn’t have to animate anything new. This is a huge timesaver – if I didn’t have the option to re-use animation data, this project would have taken much, much longer.
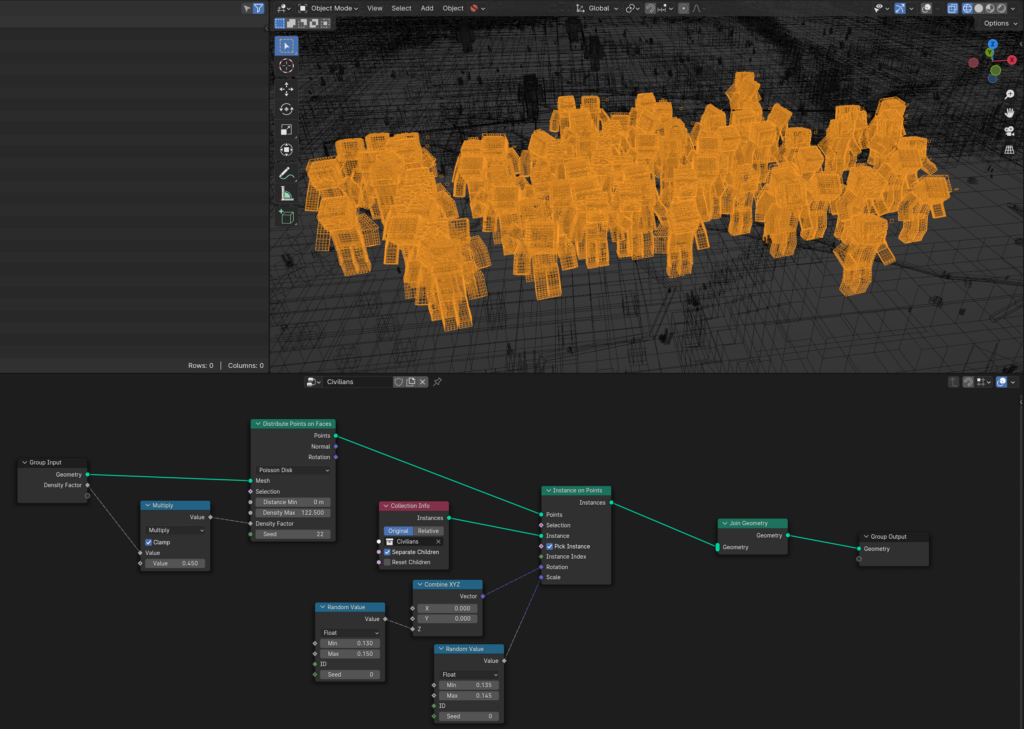
The medium complexity shots tended to require me to create something new that would take a little while. For instance, the crowd shots; I’d never done crowd shots before, but I had an idea that I could use Geometry Nodes to instance the same rigs and animations over and over again. It worked very well, to my surprise, given that I don’t know Geometry Nodes well!
Then, there were the “complex” shots. This usually included at least two or three characters and multiple interactions between objects (for example, the shot where Abby fights a Sentinel in the hallway and then runs from the others that show up). I used several techniques to animate that shot – a mixture of hand-animation, using Rokoko’s video-to-motion tool “Rokoko Vision”, and downloaded motion capture from Mixamo (a library of a ton of free motion capture files). Here’s a little breakdown that I made while I was halfway through the shot (clearly not completed, but getting there):
For retargeting the animations to the rigs I was using, I found this fantastic open-source retargeting addon for Blender, which can be found here. It’s simple enough to be easy to pick up and use, but has enough features to be exactly what I was looking for. It also has toe functionality to create save files for retargeting different kinds of rigs, and I created several that made repeated retargeting much easier: Rokoko to Thomas Animation Rig (the MC rig I used), Mixamo to Thomas Animation Rig, and Mootion to Thomas Animation Rig (Mootion is an AI tool that generates “motion capture” FBX files; it’s not perfect, but it’s pretty good and I used it in a couple shots. It also has a decent video-to-motion model that is free to use!). In case they’re ever useful to anyone, you can download them here (Google Drive link).
Additionally, a problem I ran into quite consistently was that my rig had IK (inverse kinematic) feet, but the motion capture files were just chains of FK (forward kinematic) bones – so when I retargeted them, the feet would stick in place and simply rotate. I could have switched my rig to FK all the way down the legs, but that would have made it near impossible to edit the animation at all, and I wanted some freedom there to clean up the movement after it was baked from the motion capture. So, I created a script to convert any bone from FK to IK (or rather, from FK to a baked location and rotation, which is more complicated than it should have been)! Its user interface, however, is not ideal, so I’m going to clean that up and then release it here soon, in the hopes that it can be useful to someone, somewhere, sometime.
The motion capture tools provided by Rokoko and Mootion, combined with the Mixamo library, really made this animation possible in so short a time. It would have been an insane amount of work to hand-animate the entire short. It still was a ton of work, but at least manageable.
Simulations
I had several types of simulation in this animation, including lots of cloth sims and several smoke sims (and two liquid sims!). However, as the cloth simulations are quite basic, done natively in Blender, and probably have a thousand tutorials on them, I won’t really touch on those. I want to talk about my use of JangaFX‘s tools, EmberGen for smoke simulations and LiquiGen Closed Alpha (open to JangaFX Suite subscribers) for liquid simulations.
There were 10 shots with smoke simulations in the video:
- Shot 23, when Abby and Calvin were running and the Creature smashed through the warehouse door, blowing dust everywhere
- Shot 38, when the Creature smacked a Sentinel into the wall and blew a small amount of dust around
- Shot 39, when the Creature raced down the call and smashed aside the stretcher (which it was on only seconds before), creating some dust and tracking it through the hallway
- Shot 56, when the Sentinel was shot three times and blood sprayed out from his wounds
- Shot 59, in which three explosions blew out the roof of a building
- Shot 63, in which the Creature smashed a Sentinel’s faceplate in and blood gushed up from his face
- Shot 66, in which fire was burning behind Samuel and a Sentinel
- Shot 67, in which an explosion blew up behind two Sentinels
- Shot 68, which had several simulations: The backblast from the rocket launcher, the smoke trail from the rocket itself, and the explosion when the rocket hits (as well as a little cloth sim on the leaves to the left!)
- Shot 71, in which the Creature is screaming as it emerges from the smoke (fun fact- this one is only 9 frames long, but each of those frames took over an hour and a half to render!)
- Shot 72, where Calvin is shooting a pistol and smoke puffs out after every shot


For most of these, the procedure went like this:
- Gather reference if necessary
- Animate in Blender, making sure that it’s the final motions that will be in the shot
- Export the necessary objects as either Alembic (.abc) or .OBJ files. OBJ files do not move, so they work for colliders and such. Alembic files basically take a “screenshot” of each frame, then saves it all as a sequence; thus, any moving objects would be exported as an Alembic file.
- Import these files to either EmberGen or LiquiGen Alpha
- Simulate! (There’s some great tutorials for EmberGen on the JangaFX YouTube channel. I’m not a master, by any means, but I’m decent, and I got a lot better throughout this project!)
- Export the simulations back to Blender. If this is a smoke (/fire) simulation, I would export it in .VDB format, which can then be opened back in Blender and rendered from there. EmberGen does have its own renderer, and it’s blazing fast – renders in almost realtime. However, that makes it tricky (for me, someone who hasn’t specifically tried to make this a part of my workflow) to incorporate the results back into the Blender scene, so I mostly stuck with exporting as VDB (with the exception of the gun smoke in the last shot). If it’s a liquid simulation, export as an Alembic file or a series of OBJ files. As LiquiGen is still in its Alpha state, there are some exporting bugs, but I managed to get around them with a fair amount of fiddling.
- Render, and enjoy your final product with slower render times but *chef’s kiss* beautiful simulations!
Post Processing and Editing
After everything was rendered, I brought it into DaVinci Resolve and cut it together, although most of it was exactly the length it needed to be to fit with the storyboard and be on time with the music. I used the Fusion tools that are built-in to Resolve several times to add camera shake, film grain, and various other effects. They were invaluable to me for a quick and easy post processing workflow. I explored them more in this animation than I have before, and I’ll certainly be using them again whenever I make another animation.
Sound Design and Music
The song, Fire Hunt by 2WEI, is a song I’ve loved for a while. I love all of 2WEI’s music – I sometimes just close my eyes and picture various epic stories that could happen along to one of their songs. So finding a song for my animation wasn’t very hard. I built the whole thing around it, from the first iteration of the shot list to rendering the ending title. I think it fits really well with the story I created, and I’m very pleased with how it turned out
Sound design, on the other hand, was a harder project to tackle. That hasn’t been something I’ve really focused on in any of my previous animations, and while this animation did have music to cover most things, I really felt that it would bring it up another level if I put some decent time into designing the sound. So, I did! I spend about a week working on the sound and I think it turned out really well (especially with the music to cover up anything that sounds off haha). I used Krotos Studio, which is this amazing app that lets you design sound right on your computer, like a mini foley studio on your desk. It costs $10 a month, but there’s a free version if you’re very opposed to dropping any cash on it. The paid version has hundreds of sound templates, and the free version only has like eight, so it was definitely worth it for me to pay for a single month. I’ll certainly be using it again next time I need to do sound design for anything. It makes the whole process fifty times easier than googling sound effects, downloading them, sometimes creating accounts to be allowed to download the sounds, then using them, adding reverb, all the things, blah blah blah. In Krotos Studio, you just drag your mouse around, switch whatever settings you want to make it sound different, you can add reverb, distance, etc., right in the app, and then once you’re happy, just drag and drop it into whatever editing software you’re using.
Software and Tools
Just a quick laundry list of all the software/tools I used for this project, in case anyone’s curious and wants it all in one place.
- Workflow:
- For my shot list, work plan, and planning spreadsheet, I used Google Docs and Google Sheets (free).
- For exporting Minecraft worlds to OBJ format, I used Mineways (free) and for importing them to Blender I used the MCPrep addon (free).
- For storyboarding, modeling, rigging, texturing, animation, rendering, and compositing, I used Blender 3D (free and open source, how crazy is that?!).
- For simulations, I used EmberGen and LiquiGen Alpha from JangaFX (paid, $300 for EmberGen, $400 for the Suite. It was a Christmas present, that’s why I could afford it xD).
- For sound design, I used Krotos Studio (free or paid, I used the paid version; $10/month).
- For editing, I used DaVinci Resolve (free or paid, I used the free version and it was more than adequate).
- Other:
- For collecting reference images, I used PureRef (free)
- For viewing EXR files in sequence, I used DJV (free and open source)
- For editing individual image files, creating textures, and creating thumbnails, I used Gimp (free and open source)
- For interpolating frames (which I used in one shot to extend the length of it) I used Flowframes (free and open source, although there is a Patreon available)
- The Minecraft rig for Blender I used is the Thomas Animations Rig (BlueEvil edit). The latest version of this is freely available on BlueEvil’s Discord server, which can be joined through this link.
Conclusion
Thank you so much, everybody who watched the animation. I’m super happy with how it turned out and I do plan on making more animations at some point, although currently I’m a bit burnt out of long projects like this. I may release more blog posts like this, detailing the behind-the-scenes processes of animating for anyone looking to learn or just interested in the process. I’ll also post my addon for FK-to-IK soon (UPDATE: post here, GitHub here!) in the hopes that it’ll be useful to people.
Thanks so much everyone. See y’all later.
Leave a Reply